I’ve found myself taking little diversions into geek town. There’s always been this pervasive suspicion that privacy is dead, but since Edward Snowden came out and said, “Yes, everything you feared is real and it’s much worse than you know and far worse than you could ever imagine.” That statement only added fuel to the fire for me.
How did I spend my spare time? Exploring digital security measures. After a while I started to sense that I was very much on my own, the technology of privacy is a desert. I accepted that I would never likely be able to put all of this into actual practice, so it became a kind of exploration into digital privacy for the geek thrill of finding something new and watching it work. Kind of like getting a complex rube-goldberg machine and using it just to watch it clink and clank away.
Diving into privacy has had some remarkable side-effects. It is very easy to quickly slide into paranoia. The idea that everyone is out for what you know and what you are talking about, measuring you and evaluating the things you communicate and the data you create and store. Honestly speaking, that’s a mirage — it only seems that way because you have new toys to make it all super secure, so in a way, creating super secure methods invites the notion that Eve is out to get you. Who is Eve? In crypto circles whenever people want to discuss how a crypto system works, they need names to give people to humanize the interaction and make it more relevant for people. Alice is always the initiator of the secret communications, Bob is always her recipient or contact, and Eve (which I have always mused stands for “Eavesdropper” sits in between Alice and Bob wanting their secrets and breaking through their veil of privacy.
I started with PKI, Public Key Infrastructure. It’s a fully fleshed out system which uses a pair of keys to secure anything digital, from files, to text, to even entire telephone conversations. This system has two parts, a Public Key and a Private Key. When you create your key, and key generation is actually laughably trivial, you keep your Private Key held close to your bosom and you send your Public Key to everyone you know who is using PKI. They tried to address this by creating things called Keyservers. These are systems that are run by various places that you can post your Public Key to and they’ll keep it in their database. You and anyone else can use these services to look up others and get their Public Keys. These Public Keys have fingerprints, so you can verify that the keys aren’t mangled, damaged, or shanghai’ed by some nefarious other party (Eve). So, Alice would seek out Bob’s Public Key and cast her message using the key to encrypt it. Once that’s done, the data is complete gobbledegook to everything in the Universe except Bob’s Private Key. Bob gets the message, because he has his Private Key, he can decode the message and benefit from it’s contents. Eve could of course get her hands on the secure message herself by wiretap or eavesdropping, but the message will only unlock to a very specific Private Key, so without it, Eve just has so much noise. Alas, this system only works when everyone is using the infrastructure. Everyone needs to have a keypair, otherwise there is no way to address your message, because there is an absolute lack of Public Keys to be had for anyone! And this is my headache. Even if I wanted to use PKI, it’s worthless because nobody I want to communicate with has a Public Key. This PKI, this one thing, is currently one of a handful of things that Eve cannot actually break into. And when I say Eve, I really mean the nebulous fog of the Men In Black, so the FBI, the NSA, GCHQ, those types. They are always in black suits and black sunglasses and we hope they are nice and mean us no harm, ahem, sure.
If PKI won’t work, which boggles my mind since it costs nothing at all to actually use any part of it, the next step is exploring conventional cryptography. There are algorithms that go by codenames that everyone can use. There are two different realms for these sorts of tools. There are the trade names of the tools like Rigndael, Serpent, Twofish, Blowfish, Threefish, and so on. These are the mechanical parts that make conventional cryptography possible. Alice and Bob have a secret only they know, a nice long password. They can use these tools to make their sensitive data useless for anyone who doesn’t have their password. It’s somewhat like PKI, only that both Alice and Bob need to share that secret ahead of time for any of this to work. These tools are all submitted to the government for their consideration and when a tool is submitted and chosen, like Rigndael it loses it’s authors name and picks up a big impressive name from the government, in this case AES. Advanced Encryption Standard. As a curious sidelight, Serpent was a competitor for AES with Rigndael, one won, the other did not. All of these tools have a number associated with them, these are the key length measurements and in a general way can be equated with the strength of the encryption. AES-128 is “weaker” than AES-256. These numbers indicate the number of bits used to form the secret key used in the encryption. The longer the key, the harder it is to attack the encrypted message with brute force attacking it. Having the message is easy, guessing every possible key combination when there are 256 bits in play? That’s a huge keyspace! A keyspace is an imaginary construct that tries to tie physical size to the sheer number of combinations that a key can have. A key with one bit has only two possible values, either zero or one, so it’s keyspace is 2^1, or two. If it isn’t zero, it’s one. The keyspace for AES-256? It’s 2^256, or 1 with 77 zeroes after it. That’s an insanely huge keyspace, so the idea of being able to brute force it is laughably meaningless. It’s worthless to try. The nice thing about these tools is they can be used solitarily. Yes, you could use them to share secrets with other people, but a more useful approach is to use these tools to keep your data secure while it’s stored somewhere. If you don’t have that somewhere always under your conscious control, you really need these tools to make sure it’s secure from Eve and her minions. This starts an arms race of a sort. The tools themselves compete along with their key lengths, and cryptologists, fueled by paranoia perhaps are always trying to come up with clever ways to break these tools. To prove the strength of your tools, you push them until they break, then you know what kind of pressure they can withstand. Where we are now, AES-256 is considered secure, even against Eve, but that is eroding with time. Why? It comes down to that keyspace I mentioned earlier. There is another batch of tools called hashers, they convert something into something else and that conversion is one way only. You can hash a phrase “This is a secret” using a hash and it spits out a long strip of character data. These hashers can be used to turn your password into a key that the tools use to make your data secure. Currently we have much like the encryption tools, a series of named tools from their creators and the government’s renamed tools. What used to be MD5 became SHA-1, SHA standing for “Secure Hashing Algorithm”. The problem is that hashes can sometimes collide. If you put in “something A” and get a hash, the only way you can feel truly safe is if there is nothing else that works to create that result. A collision is when something else also works. When the hash of “something A” and “something B” are the same is a collision. When you have a hash that is a victim of collisions, the keyspace that hash can help you create is decimated. Much like a burning barn, whenever there is talk of a detected collision, people flee the old tools because they broke. Eve and her minions are onto us! This is why SHA-0 was abandoned for SHA-1, and that was abandoned for SHA-2, and now Keccak was chosen for SHA-3, that’s where we are now.
The paranoia doesn’t stop with Alice, Bob, and Eve. The paranoia snakes its way into the government. Ever since Edward Snowden shared his Pandoras Box with us all, the arbiter of national standards, NIST, is now just as suspect as Eve and her minions are. NIST is the organization that adopts tools into their formal-sounding government rebranded tool names. Rigndael became AES through NIST. Do we really trust AES? NIST has their hands in it, and we don’t trust NIST, so… thankfully when these competitions are held for the vaunted position of NIST winner, the other competitors don’t simply disappear. This led me from AES to Serpent, which was not selected by NIST. Honestly I think AES-256 is still trustworthy, but there is a part of me that prefers Serpent-256 more.
These algorithms are all eventually going to break. Every tool has it’s breaking point. Even Serpent-256 will eventually fail when some clever person figures out an attack that works against it. There is only one algorithm in the entire Universe that is perfect and cannot possibly fail, and that is the one time pad. Cryptology started there and oddly enough created its pinnacle first. The requirements for the one time pad are really steep and its incredibly inconvenient to use. The first thing is to create the pad, and you need a truly random key. If the key has some pattern or design to it, your key can be derived later and it’s worthless. Also, you need enough key-meat to cover your entire message – and if your message is big, you need a lot of key-meat. Plus with big keys there is another problem, how to share that sucker! The key for the one time pad is everything, so you have to do it person to person and you have to make sure that the key doesn’t leak out or get stolen. That’s the danger of the one time pad, the key is a thing not a calculation. What makes it immune from attack opens it up for theft. If you are certain that your key is safe and sound and truly random then the data you encode with the key will adopt the randomness from the underlying key and be impossible to attack using any method, cleverness or brute force. My explorations took me down the path of the one time pad, but it only works to secure data solitarily, sharing data? You need to have the key in multiple places and you can’t be in two places at the same time to make sure that the key is always secure, and you can’t stay awake and vigilant to ensure it either. So what is perfect is ironically total crap. In the end, you are back to the algorithms themselves and until someone can fix the problems with the one time pad, we’re always going to be in an arms race over the strength of our toolkits.
After all this data security geeking that I got myself wound up with I started to branch out and looked into places where cryptography intersects other parts of life. One of the most compelling and frustrating places where this is occurring is cryptocurrencies. Bitcoin was invented by Satoshi Nakamoto. Who is Satoshi? Nobody knows. He may be real or he may be a group of people or he may be an alias. What he created though is amazing. Bitcoin is a currency, you can use it like money, store value, transmit it, and it appears to have all the conditions to be equivalent to fiat, which is a codeword for “cash”. The US Dollar is fiat, Bitcoin is not fiat. Bitcoin is not like the US Dollar, it isn’t based on faith but rather on mathematics. The US Dollar used to be linked to gold, called the gold standard. For every dollar that was in existence it was tied to so much physical gold that you could in theory exchange whenever you wanted to do so. In October 1976 the US Government abandoned the gold standard and US Dollars were then simply an instrument of faith that the US Government was “worth it”. It also helped that everyone here uses the dollar for everything, so it’s natural to use it and not think too hard about what value lies behind it – because the only thing behind it is a big group of old white men smiling and staring at you.
The way Bitcoin works is both involved and really quite elegant. There is a central record of all transactions that have occurred since the currency was invented and that public ledger is called the blockchain. It is a list of transactions in blocks and those blocks are in a way, chained together. As people use Bitcoin, they create new lines in the ledger and share that with every Bitcoin node. A node is the full Bitcoin client, it’s run by anyone and everyone, you can run one too. What keeps the blockchain authentic and honest lies in its ubiquity. It’s in copies worldwide on hundreds of thousands of machines. It transcends national borders, gender, race, creed, orientation, and economic class. Because there are so many perfect identical copies, any “wrong” copy, made that way by trying to be clever gets rejected. As people use Bitcoin, the transactions pile up in the blockchain, and it’s the job of Bitcoin miners to calculate hashes of all the transactions, a feat that is made hard-to-accomplish so as to create a valuable proof-of-work. The Bitcoin miners have to sweat it out to get their reward. When a miner succeeds in adding a new block of transactions to the blockchain they get a reward of 25 bitcoins. This is how the currency injects new “bitcoin matter” into the trading space. Miners secure and codify the blockchain, the blockchain rewards them with value and the miners then use that value in the marketplace. Over time this reward will be halved, so it’ll be 12.5 bitcoins, and then after a time this will be halved again until all the Bitcoins that will be created through mining are expressed into the marketplace by miners. Bitcoin will have this mining subsidy in place up until 2140, but by that time the protocol may change, so it might end then or it may never end. Another thread of value for miners is the transaction fee. When you issue a payment in terms of bitcoin you pay what you owe plus a customary transaction fee payment as well. This fee is 0.1 millibits or roughly 3¢ USD. This transaction fee is a static fee no matter how big the bitcoin transaction is.
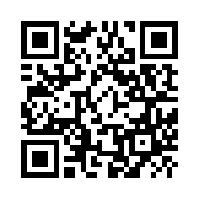
Using bitcoin itself can be a little bit daunting, because the public address for bitcoin is a rather ugly long string of characters, such as this one, which is one of mine: 1KxM4U6Q5hYdfi9aSEeS7vj9cBZyrnADJJ. Typing this in manually is an epic pain in the ass, however there is another technology that already exists called QR codes. These graphical representations can represent these long strings of characters in a single easily printable symbol:
 Bitcoin is formed much like PKI conducts business, there are Public Keys and Private Keys. The code above is a Public Key address for a Bitcoin account. This address can hold value, it can receive value and I can look up its value in the blockchain and see how much value is there expressed in Bitcoin. If I want to move the value somewhere else or use the value stored there for any purpose, I need that codes companion Private Key. When you have a software wallet, one of its core features is the creation of these accounts. They are free and easy, as they are calculated from the pseudorandom number generator in all contemporary computers. The core of a Bitcoin account is based singly on the Private Key. That is created first using pseudorandom sources and then the Public Key is calculated from the Private Key, it’s a hash, so you can’t reverse the Public Key and derive the Private Key. Modern smartphones are where Bitcoin really shines, iPhone or Android devices have apps that can manage these wallet codes, both Public Keys and Private Keys, so they operate just like a real wallet. You can get money using them and you can pay using them too. It’s in the QR code that makes the transactions simple. Your device takes a picture of the QR and decodes it and then acts on that data. You don’t need to (but you could) hammer out the Public Key address to make everything work the way you expect it to.
I spent a while exploring Bitcoin, and playing with various wallets. There are online wallets, there are device-based wallets, and there are paper wallets. The online sites are a crapshoot, some of them work okay, and others are bitcoin roach motels. I don’t like the hosted online wallets, they are just too fragile and sketchy for my tastes. On device wallets are really quite good, iOS more than Android only because iOS is a really well secured platform. You can also download the client for Bitcoin, the reference client and download a copy of the entire blockchain and use that to record bitcoin transactions if you like, but the blockchain was about 20GB the last I saw it, and that was too big for a machine like my Macbook Pro to store. Some wallets that are for computers use a variant of transaction confirmation called SPV, which depends on a reliable string of confirmations to ensure that the current shape of the blockchain is correct. The nice thing about SPV wallets, or thin wallets as they are called in comparison to the fat wallets of the reference client of Bitcoin is that the sheer size of the blockchain doesn’t need to be stored locally, it scales better with less storage space required. Even these computer-based wallets have their vulnerabilities and that’s why there are paper wallets. Paper wallets have their Private Key printed out as a QR code and hidden behind folded paper, with the Public Key publicly visible. These paper based wallets are really convenient for storing the value of bitcoins off of computer equipment. The value itself is still in the blockchain, in the ledger itself, but the security of the Private Key is now just on a slip of paper. If the paper is destroyed, the Private Key is lost forever and the value associated with it is lost. The value is still in the blockchain, but since nobody can get at it, the Public Keys can’t be converted into Private Keys, the value is completely inaccessible, and really lost forever. As I explored paper wallets I also got to thinking about one of the core assumptions of a lot of hosted and online wallet systems. They all depend on pseudorandom data to forge the Private Key. These generators create random-looking data but there is always a slim chance that someone could figure out the way the numbers were created and make the pseudorandom deterministic. If you could do that, you could simply replay how the pseudorandom generator did its work and replay out the supposedly random Private Key and then your security is down the toilet. All the value associated with that Private Key is vulnerable and your money could just evaporate, poof. Bitcoin Private Keys are forged from 32 bytes of random data. That key length is familiar, I’ve spoken about it before. 32 bytes with 8 bits per byte is a Private Key composed of 256 bits. That’s 2^256, a keyspace that (like we saw before) is 1 with 77 zeroes after it. So I started to think about ways to create truly random bytes to use in my own paper wallets, I wanted it to be pure from the get go. If I could accept an online answer, there are many sources including one of my favorites, which is Hotbits (which creates randomness from radioactive decay). What I wanted was a somewhat convenient way to create my own random bytes without having to use a computer at all. I discovered Hexidice online from a gaming store. These dice have sixteen values on them, 0-9 and A-F. One die is 1 nibble, or half a byte. That means that two dice are 1 byte, and 8 dice are 4 bytes. If I throw eight dice eight times that creates 64 nibbles or 32 bytes. I could technically do the mathematics myself to convert this pure random Private Key into a valid Public Key, but for that part I’m actually okay with using an offline copy of Bitcoinpaperwallet.com on my Macbook Pro. I just turn off the Wifi, start the offline copy of the site and type in my forged Private Key, the system then helps me calculate the Public Key and then make a very attractive paper-based wallet with fold lines and neat graphics and everything. When I want to add value to the paper wallet all I need to do is scan the QR code printed on the front as the Public Key and I can add money to that in a snap. If I want to use the money or move it somewhere else, I need to unfold my wallet and add it to my phone temporarily. That actually is a bad thing, because it would then technically expose my previously Private Key to the world through my phone. If I wanted to be really careful I would prepare a new paper wallet, then use the old one, buy something with it and the remaining value would then need to be immediately sent to the Public Key on my new paper wallet. Then the old paper wallet could be burned.
Once I figured out the storage mechanisms for Bitcoin I got to thinking about how to exchange fiat currency for Bitcoin. There are two distinct ways to go about this with some blurry spots in-between. The one way is to use a regulated exchange, these companies allow you to buy Bitcoin by opening up access to your bank account or debit card and prove your identity to the exchange. The other way is through Localbitcoins which connects you to people who are willing to exchange fiat for bitcoin over-the-counter using cash. The first way is okay, but it irks me because you have to reveal your identity in order to move forward. The second way is more secure and anonymous, but you have to put up with people who may or may not be trustworthy. They may make off with your cash and not give you any bitcoin, it’s a risk. The blurry spots in between? Those companies operate somewhat like the regulated exchanges except they depend on the US Postal Service to be the money mule. You buy a postal money order for the bitcoin you want, mail it to the exchange, and they transfer the bitcoins that you purchased to the Public Key you provided them.
Once you get fiat exchanged into bitcoin you can buy things with bitcoin. Shops could accept bitcoin by simply downloading a Bitcoin wallet and creating a Public Key, making it visible to customers and payment would be the capture of a QR code and the speed of the blockchain makes payment verification easy within 10-15 seconds of the initiation of the payment cycle. Bitcoin can also be used to move value from one place to another instantly without having to endure regulations or custom controls. If you are in a foreign country and need money, you could use bitcoin as a money mule. There are so many ways bitcoin could be used, the applications are just as many as exist with fiat currency.
All these explorations with bitcoin were occupying my spare time and I got a chance to read more of what Edward Snowden had to say. In one message he expressed interest and promise in a program called BitMessage. So of course, I went looking. BitMessage is structured a lot like Bitcoin, except instead of money the “currency” is messages. You can download the BitMessage client for free and start using it. With the BitMessage client, you can create a BitMessage address – such as BM-2cWAk99gBxdAQAKYQGC5Gbskon21GdT29X. If you had BitMessage and sent me a message with this address, I would get it. The neat part about this system is that it encrypts the message and the identity of those in the conversation. This is done very much the same way it is with bitcoins blockchain. Alice posts a message for Bob, it’s encrypted and then sent to everyone, sent to BitMessages “blockchain”. Bob can see this data store and because he has the Private Key that is associated with the BitMessage Public Key that Alice used to send him a message he can actually decrypt this section of the Bitmessage “blockchain” and read it. The message itself cannot be traced to where it comes from or where it goes off to, it shifts that sense around. Everyone has copies of all the encrypted traffic on the system, and only those with the proper private keys can read the appropriate parts and communicate securely. Bitmessage is neat because it bakes PKI into one simple program. As I started to fiddle around with Bitmessage I thought that adding PKI on top of Bitmessage could prove useful as an added layer of security. The only thing you have to watch out for with standard PKI is that the key generation process really wants you to put in a true reliable email. You don’t have to if you don’t want, you can create a keypair without an email, in that case you could be nobody@noemail.com, if you like.
I started to think about the practical applications of Bitmessage and PKI. If you had to get some super-secure message out of one place and you were paranoid about privacy you could go to a website on TOR and get your contacts Public Key and anonymous Bitmessage address, use the Public Key to encode your message, open up Bitmessage and post the information to the BM address and send it knowing that your transmission and their reception could not be tracked and the contents of the message could only be opened by the person with the right Private Key.
What then for all of this? Nobody using PKI, no locals using Bitcoin and no shops accepting it, and nobody but curious lookeyloos using BitMessage? At least I’ll be prepared for Eve and her minions. If you would like to regain some of your own privacy, just let me know and I would be very happy to help you navigate the technology and see how neat all these tools are to use.